17
Dec 17

Madelines

Well, this post has sat around as a draft for two years now, so maybe I should finish it…

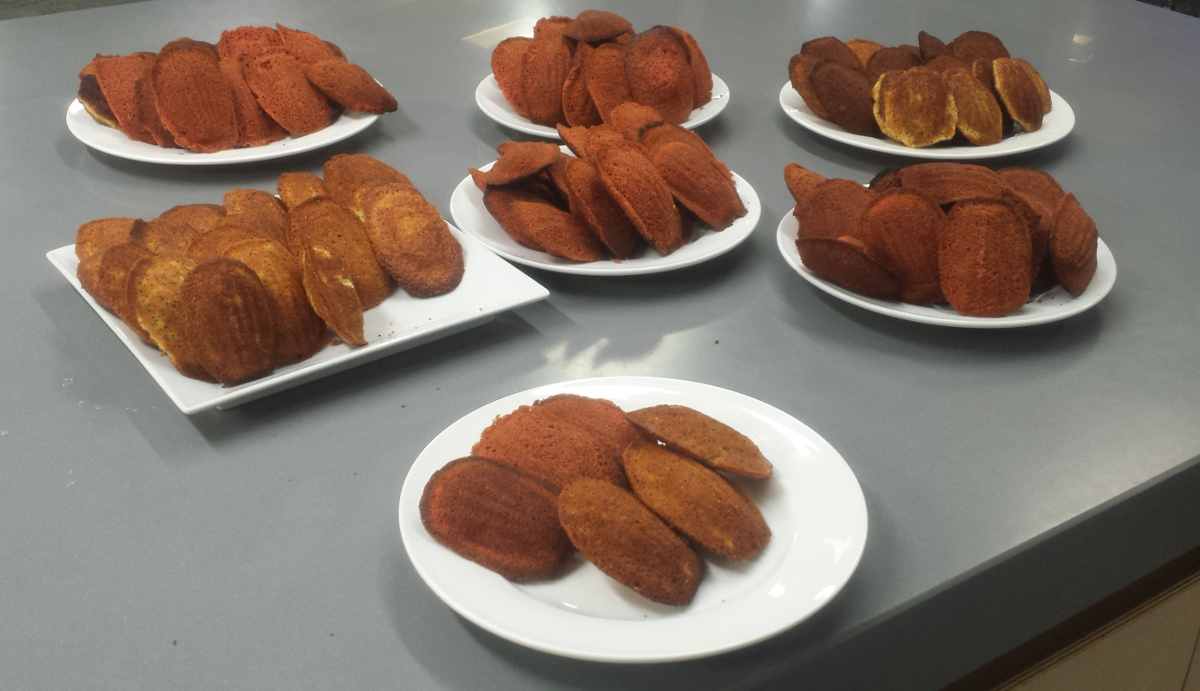
Anyway. Madelines. Small crunchy-on-the-outside citrusy sponge cakes that are brilliant with a cup of tea in the morning. Yes, crunchy. If you’ve had them and they were soft, they weren’t fresh. They go soft as they go off.

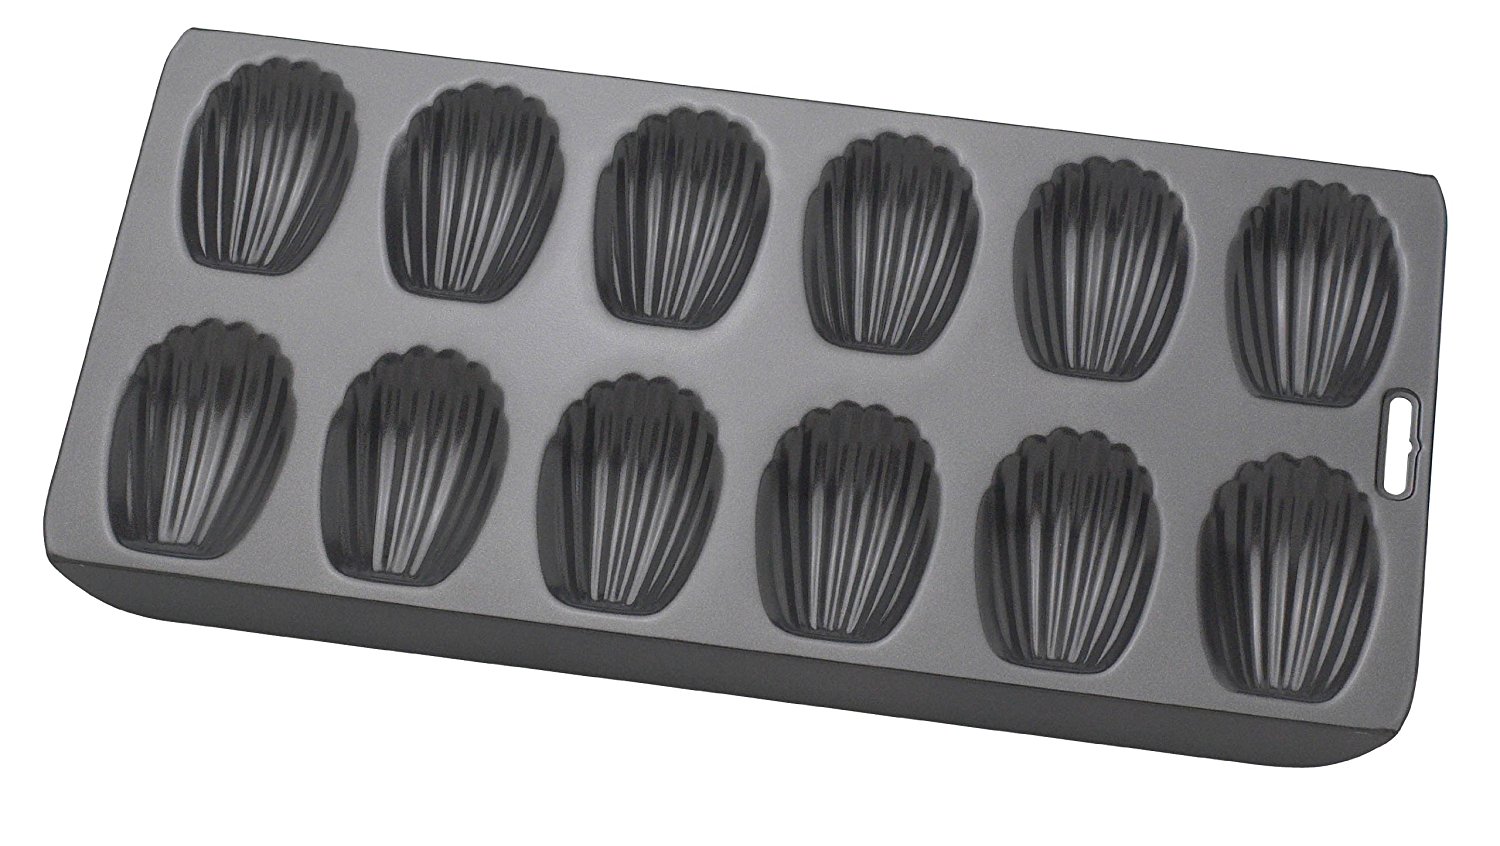
Also, you need a special pan. Yes, you do. You can pour the batter into anything but it won’t be a madeline, the same way it’s a stew instead of a tagine unless it’s made in a tagine or a casserole has to be made in a cassarole or a … you get the idea. It’s one of those named-for-the-dish cooking vessels. For madelines they look like this:

Sorry, no, google I said “madeline pan“…

And you’ll want to have a piping bag. You’ll think you won’t but you try doing this with spoons and you’ll wind up swearing a lot about how next time you’ll use a piping bag.

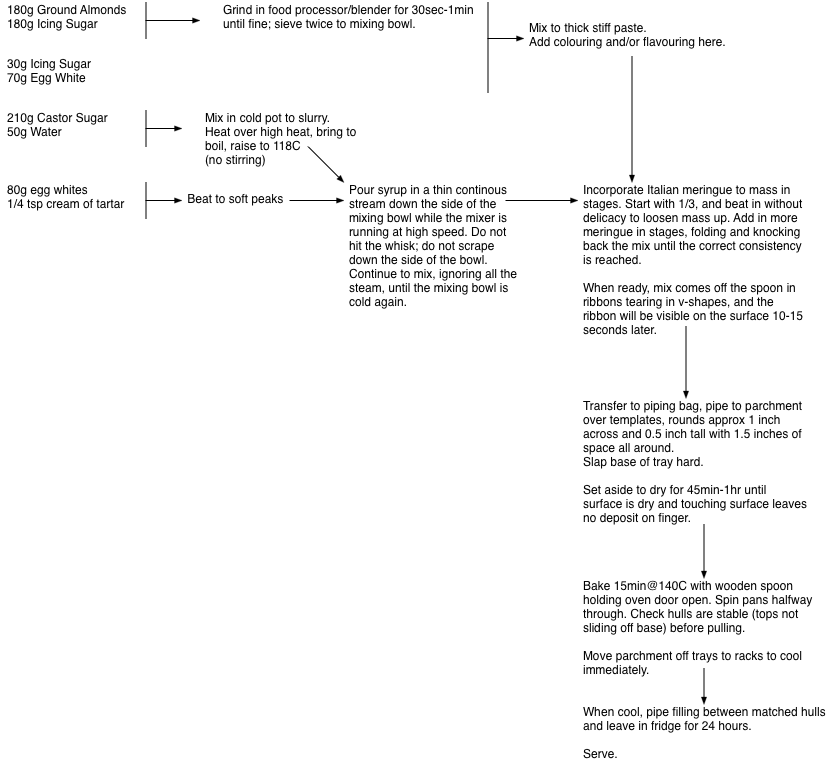
Also, preheat the oven. Temperature is a massive thing for this recipe, as is piping in the right amount of batter.

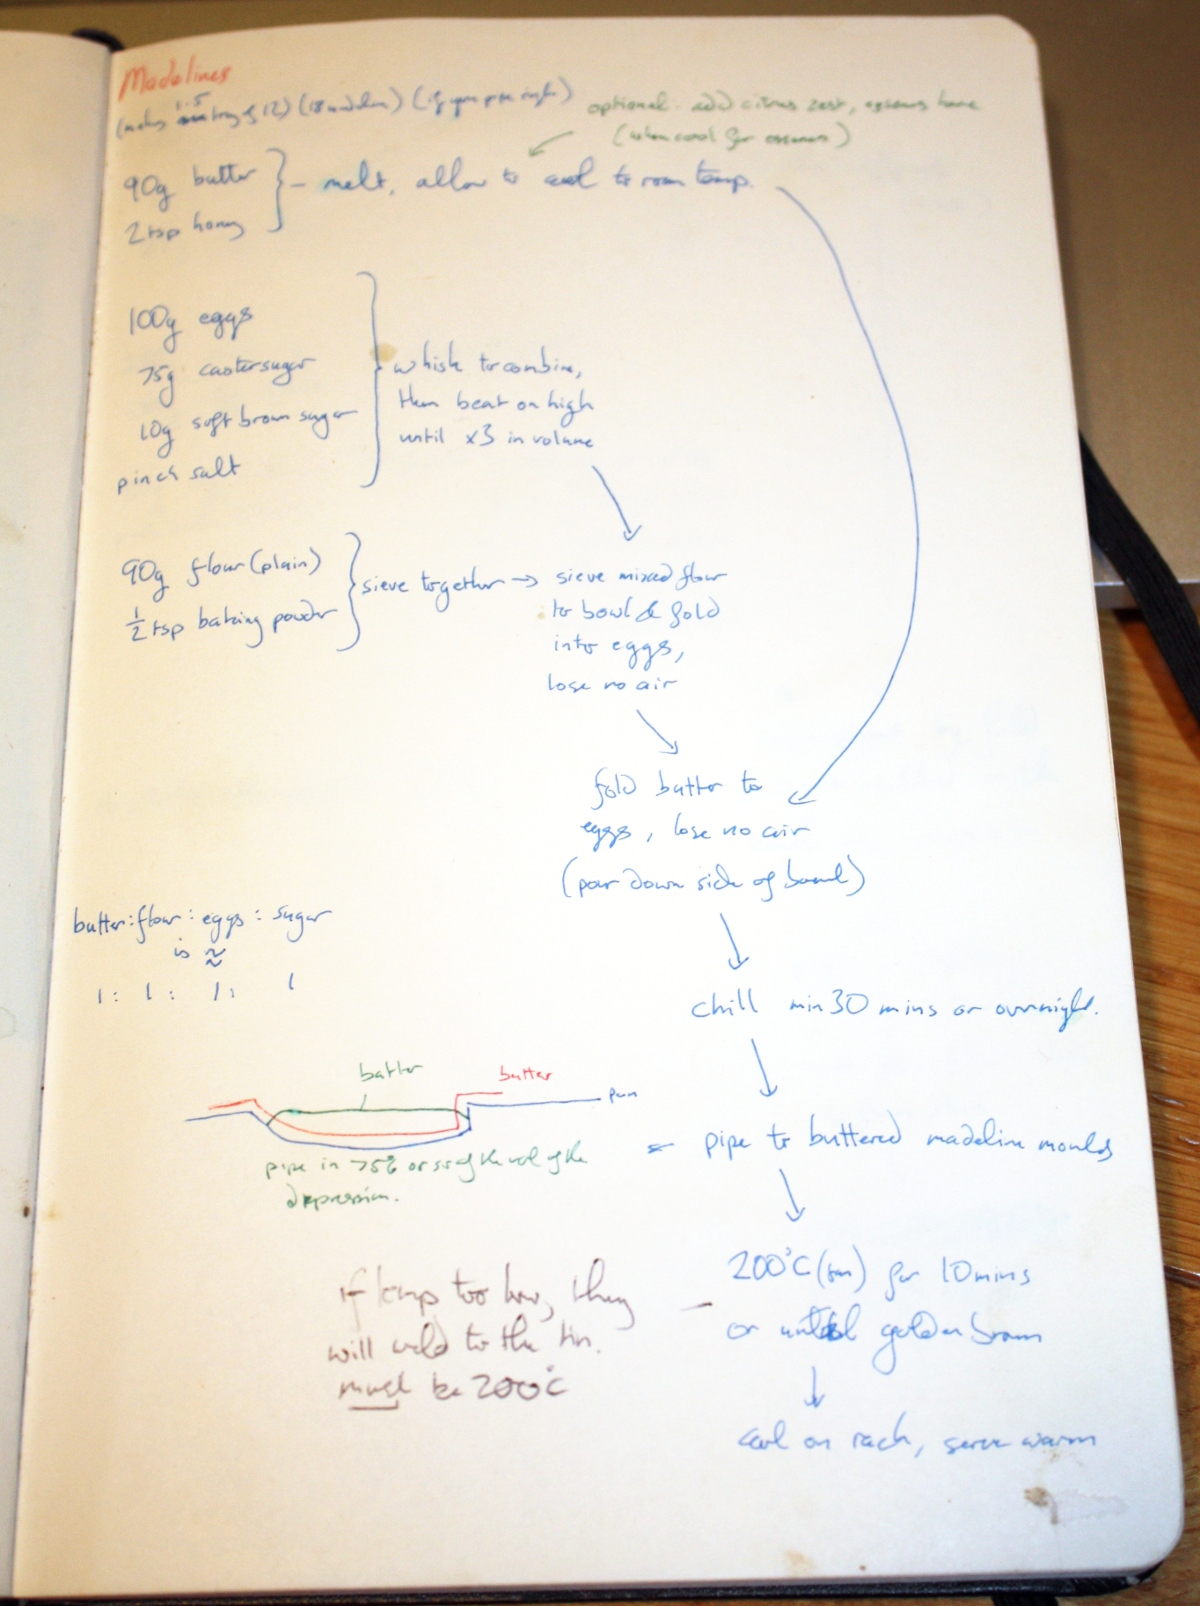
The easiest way to start is in the stand mixer bowl (you don’t need a stand mixer. You also don’t need a car to get to work, the bike or bus or train would do fine, but you’re a fancy sod, aren’t you?) and try to get 100g of eggs in (just keep cracking eggs till you’re at or past 100g, then scale all the rest of the recipe to match – the rest of the amounts here will assume you got to 110g, beat the eggs to a homogenous mix, then ditched 10g of the egg mixture because you’re phobic about maths).

Now, 90g of butter and 2 teaspoons of honey into a small pot, melt gently on the hob and let it come back to room temperature. Once they’ve melted and are cooling, you can add citrus zest or vanilla essence or whatever you feel like. Personally I like lemon zest and vanilla here and adding a handful of poppy seeds to the flour later but if you want to make mint salted caramel madelines, well, not in my f*&$ing kitchen you’re not.

Now, back in the stand mixer bowl add 75g of castor sugar, 10g of soft brown sugar and a pinch of salt. Mix with the whisk attachment by hand just to get the sugar off the bottom and into solution, then put the attachment back into the machine and whisk on high until the mixture triples in volume. Don’t cut this step short, this is all the air that’s going into this and you don’t want to eat window putty, you want a light sponge which means lots of air at this step.

Next, sieve 90g of plain or self-raising flour into a bowl. There’s not enough difference in the two flours to really worry about at this stage. Michelle Roux Jr. might worry, but unless you’re a professional pastry chef who’s famous for his desserts and underpaying his staff, the difference isn’t going to be very important to you. You’ll screw something else up sufficiently to hide the difference anyway.

Now, sieve the mixed flour into the stand mixer bowl, folding it in carefully with a spatula (yes, turn off the mixer and take the bowl out first, or it’s going to be very funny for everyone else). Lose as little of the air in the batter as you can. Once you’ve finished all the flour, do the same with the butter that’s by now cooled to room temperature (if it hasn’t cooled and you try this, you’ll scramble the eggs, which will suck and won’t make madelines). Pour the butter down the side of the bowl rather than dumping it directly into the batter, or the whole thing collapses and sinks like a souffle in a cement mixer.

Fill the piping bag, then put it in the fridge and forget about it till tomorrow.

Next day.

Yes, the next day. Feck’s sakes, you didn’t start reading this ten minutes before you needed them did you? Anyway. Next day. Preheat the oven to 210C.

Take a tablespoon or two of butter and put it in a plastic bowl and microwave it till it’s almost melted (or, if you don’t have kids you can use a small pot on the hob or microwave it in tupperware or whatever). Now brush it on the depressions in the pans. You don’t want a thin translucent smear here; you want a thickish coat because that butter is going to fry the batter for that crust. I mean, not a tablespoon per madeline, but a good schmear.

Now, pipe in batter to each depression. You want to fill each depression by about 75% – I usually find that piping at a good rate from one end to the other and back again is about right, but give it a go yourself and you’ll figure it out. Or, you know, just give up, curse the whole thing and buy them from a bakery in future.

Then put the pan into the 210C oven (no, put it back on the counter and feckin’ wait for the oven to heat up, for feck’s sakes…) and immediately drop the temperature to 200C and bake for 10 minutes or until golden brown. The batter will rise in the oven in a small peak in the middle of each madeline, called the nipple because it’s a french dessert and of fecking course it is…

Knock them out of the pan immediately (and then use a butter knife to prise out the last two that always stick) and then cool them on a rack for a few minutes until you can hold them without burning your hand, and serve while still warm.

Oh, and if you can’t serve them warm, leave them cool completely and then dip them in chocolate. I mean, they won’t be as good as fresh, but they’ll be dipped in chocolate and well, what isn’t better for being covered in chocolate?


30
Apr 16

Macarons

So the latest thing I’ve tried baking are macarons. Not macaroons, the coconutty biscuit things, but the french almond meringue biscuits with fillings. The ones they fly into Brown Thomas from Laudaree in Paris daily and sell for obscene amounts of money. I figured, if I could make Madeline, why not something else classic and French? How hard could it be?

And the answer is, not very. They’re a little fiddly but ultimately if you can make a meringue and have some patience, macaron are just not as hard as everyone says they are.

There are two or three things you have to do that don’t seem to be written in most of the books mind you, and if you skip those, you get awful results. So here’s my recipe, with notes:

This makes enough macaron biscuit mix to fill one standard large disposable piping bag and that can make up to sixty macaron (120 hulls) if you make them small. I don’t suggest making them small, the less mass in a macaron hull, the fiddlier the timing on the bake.

MacaronRecipe
Step 1:

180g ground almond
180g icing sugar

Place in a food processor or blender and run it for about 40 seconds. Tip the resulting flour into a large bowl, making sure to get all the bits that will have caked to the sides of the food processor bowl. Now take another large bowl and a sieve, and sieve the contents of the first bowl into the second. Some of the contents won’t sieve, it’ll look like cornmeal or polenta grains. There shouldn’t be much of this, but you might have a few spoons on this first pass. Discard it into the bin. Now sieve the contents of the second bowl back to the first bowl. And repeat this process, discarding anything that doesn’t make it through the sieve, at least twice.

This is the first thing that tripped me up. The thing is, almonds, like all nuts, have oil in them; grind them fine and you get a paste, not a flour – you have to add powdered sugar to the mix to stop that, or have fancy equipment or techniques like cryomilling (which I can’t do because liquid nitrogen’s not readily available here). So most companies selling ground almonds don’t grind them fine. And if you just use their stuff neat, you get a macaron that looks like you made it out of sand and worse yet, it won’t hold liquid properly so it won’t bake right. Either take the time to do this grind-and-sieve routine (and if you discard a lot of material, you’ll have to start off with a lot more; you want 360g of mixture when you finish, not when you start ideally) … or else go to one of the fancy online shops and buy the mix pre-ground and pre-made. It’s not cheap, but neither are ground almonds. I pay about €15 per kilo of ground almond (in the Asia Food Co on Mary St. in Dublin) – Meilleur du Chef will charge you €20 per kilo of the final mix, plus shipping. Your call.

Either way, with the mix made, put it in a bowl (one of the two you used will be fine) and add 30g of icing sugar and 70g of egg white.

The egg whites are a bit of a thing with macarons, especially if you use the french meringue method (I tried that method, it was too fiddly and slow). If you’re getting them by cracking and separating eggs, you’re advised to let them sit in the fridge for a few days to age, so the proteins break down and they don’t form as firm of a meringue which makes making the final mix easier. Personally, I just buy a bottle of egg whites from Dunnes and don’t bother to get the freshest one on the shelf. I mean, you want to leave a petri dish for bugs in your fridge for a week, well hey, it’s your immune system. Me and my aged pasteurised egg white in a convenient container will be over here.

Now take a wooden spoon because silicone spatula heads tend to come off the handles in mixes this stiff, and fold all the liquid into all the powder. It’ll take a minute, but there is enough powder to do it.

A note here – if you’re adding colours or flavours to the hull, you can do so here. Just mix the powdered flavour (like espresso grounds or finely ground tea leaves or matcha tea); or powdered food colourings or even gel food colourings, into the mix at this point. Liquid food colourings and essences are trickier because even that little liquid here can be a bit of a pain. I stick to powders and gels for colourings if I use them and powders for flavour.

A related note is that you can use any nut to make a macaron, it doesn’t have to be almond. Almond’s nicely neutral, so if you want to use pistachios, say, you can just swap out a portion of the almonds instead of all of them. Experiment. I tend to use 2/3 pistachio when making pistachio macarons. I’ve tried using breadcrumbs for bread flavour with limited success too.

Step 2:

Next up, take 80g of egg white and put it in the bowl of your stand mixer. You can do this with a handheld electric whisk in an ordinary bowl but a stand mixer is more convenient. If you have neither of these, don’t make macaron. You’d badly injure yourself trying to do this with a hand whisk.

Add a half-teaspoon of cream of tartar to the egg whites. You could skip this, it’s designed to help the meringue form, but that’d just be masochistic.

Whip the eggs to soft peaks and then stop whisking completely. You don’t want too much air in here. You can add some liquid flavours here if you want – vanilla, various essences, that kind of thing.

Step 3:

Here’s where you can get some serious scarring so don’t be stupid.

Take 210g of castor sugar and put it in a pan. Preferably a medium sized one with a pouring spout, but it’s not mandatory. Don’t put it in a small pan though because any boilover would be a pain in the fundament. Add 50g of water to make a slurry, and stir the dry sugar into the water with an ordinary spoon. You just want all the dry sugar made wet, it won’t dissolve yet. Throw the spoon in the sink now; you won’t be stirring this again. Put the pan on full heat and leave it come up to 118C. Don’t stir. Swirl if you have to in order to ensure it’s melting evenly at the beginning, but generally this is a don’t-touch affair. Use a candy thermometer or an infrared thermometer (they’re nearly as cheap as a good candy thermometer these days – the gun ones are only about $30 on ebay and smaller pen ones go for as little as $15). Whatever you do, don’t stick a finger in there or splash it on yourself; at 118C, it’ll cook you if it hits you and it’s sticky when in contact with proteins (like, say, those found in human flesh). Generally bad news.

Once you get up to about 115C, it’s time for Step 4:

Turn the stand mixer up to full speed. When the sugar syrup hits 118C, carefully take the pan and pour the syrup down the side of the stand mixer’s bowl in a thin continous stream. Don’t dump it in all at once, but don’t add it drop by drop either, it’s cooling very rapidly now it’s off the heat and that thermal energy is needed in the mixer, not the air. Just pour in a thin, continuous, steady stream at the side of the bowl.

Don’t hit the mixer’s whisk. Don’t stop and scrape down the sides of the bowl. Just… pour.

Now let the mixer run until the steaming meringue mix in the bowl isn’t steaming any more and no longer looks like it wants to climb out of the bowl to strangle you. You can leave it continue to beat until the bowl goes cold; that’s the classical meringue technique. Or you can use it straight away. I can’t tell the difference really.

On to Step 5. And this one is a bit finicky. You have to mix the meringue into the mix from step 1. Which is a very stiff paste. But you don’t want to mix all of the meringue in. You will have a little left over at the end most of the time. You make a little more than you need because it’s a lot easier to have it and not need it than to need it and not have it.

Mix it in, a spatula load at a time. The first spatula or so, you can just beat in with the wooden spoon to loosen the paste up. No sense being delicate there, it won’t work. But the more you add, the looser it will get, so go easier as you go on. You do want to fold it in and keep some air; but not all of the air in the meringue is welcome; the macaron hulls are not light airy fluffy things, there’s a little density to them.

I don’t have an easy way to test for all this. You kindof have to do it by eye. I tend to pull the spatula from the mixture and let it drip in ribbons back onto the surface. If it can’t drip, it needs more meringue; but you want the ribbons to hold their shape on the surface of the mix for at least ten seconds. The consistency should be like overly thick potato soup, or thick porridge, and gauging it does just seem to be a try-it-and-see kind of thing.

Step 6:

Fill a piping bag with the mix; put a preprinted template (like this one) on a baking tray and put parchment paper over that, securing both with a small dab of the mix here and there. Now hold the piping bag vertically over the center of a circle on the template about 3mm off the parchment paper, and squeeze. Keep squeezing until the mix reaches the circle; then lift off vertically (you can snap if you know how, but a vertical lift, while leaving a tail, ensures you didn’t also leave a pit). Do that for all the circles in the template. Resist the urge to pipe over the template size; it never ends well. You need the gaps between the hulls as they will spread a little, and more importantly, they need to air-dry first.

Air-drying is really important for this process btw; once a tray’s piped, you have to leave it sit untouched for 40 minutes or more. Test it after that point by very gently pushing on a macaron. If the surface deforms and your finger stays dry, it’s ready to bake. If it sticks to your finger, it’s not. If you do this, when they go to expand in the oven, the skin that’s formed won’t split and the entire hull has to lift upwards, exposing new mix to the hot air of the oven which dries it even as the bubbles are exposed to the air; this becomes the foot, the little bubbly ridge around the base of each macaron hull.

Step 7:

Once airdried to a skin, set your oven for 150C and let it stabilise there, then put in the trays of macaron that have airdried, and close the oven door, but leave a wooden spoon in there to crack it so the water vapour can escape. Rotated the pans at 10 minutes, and cook for five more.

Step 8:

Remove the parchment and attached macarons to a rack and allow to cool.

Detach from the rack, match hulls for size and shape, then pipe filling and squeeze together.


2015-11-23 11.14.332015-11-19 20.47.56a 2015-11-09 12.03.53a 2015-11-23 11.13.40 2015-11-30 11.50.00a 2015-11-23 11.13.35